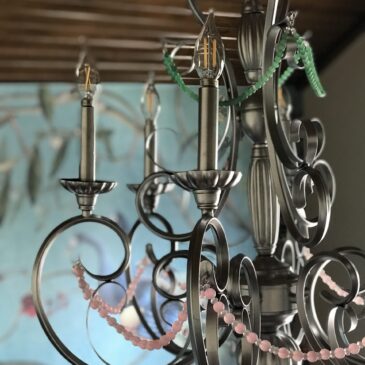
About these ads
About these ads

DIY Hometown Map Coasters

DIY Map Coasters

Last month Dear Husband had to bring a gift to the office dirty Santa party.  Finding something that is not gender specific, less than $20 and is totally awesome for an office party can be challenging.  This year I decided to try my hand at homemade coasters.  I’m sure all you DIYers out there have seen the coasters made from tiles from the hardware store.  You know the ones I’m talking about…kid hand prints, stencils or craft paper modge podged on the tile.  Since I didn’t know if a man or woman was going to receive this gift I thought a local map would work best.

These turned out great, we’re fairly easy to make, were less than $10 and the person who got them in the dirty Santa game was very happy.  Winning.

diy coaster supplies

Here’s what you need should you find yourself in the need of a thoughtful yet inexpensive gift:

1 box of 4×4 tiles from the hardware store (Lowes, Home Depot, etc.)  Ceramic tiles will work but I used tumbled marble.  A box of 10 tiles was about $4.
clear drying Modge Podge
Valspar sealer (satin finish)
antiquing paint
sponge brush
local map
felt
hot glue

I got a free map from our Chamber of Commerce (Visitors Bureau is a good place to go too).  The weight of the paper was heavier than a typical road map and I think worked much better than the light weight paper of a AAA map you would find in your glove box.

diy coaster instructions

1.  Decide which parts of the map you would like to use then use a tile to trace out the shape.  I wanted a rustic look so after cutting out the square I tore the edges off so that the map was slightly smaller than the tile.

diy coaster instructions

2.  Using a sponge brush, apply a very thick layer of Modge Podge to the tile.  Place the map on top and do your best to smooth it out.  There will be a few air bubbles so try to push those air pockets to the edge.  Allow glue to dry, about an hour.

diy coaster instructions

3.  Now for the antiquing paint.  Use a sponge brush to apply a thin layer of paint.  Cover the top and all the sides of the tile.  Using an old rag, immediately wipe off the excess paint.  As you can see, I found it next to impossible to get the map completely flat on the tile.  No matter how much I tried to smooth it out there were always little wrinkles.  I convinced myself that the wrinkles are part of the “aged” look and it’s supposed to look like that.  Whatever you have to tell yourself to make it seem like you know what you are doing is just fine.

4.  Allow the paint to dry for about an hour.  Next, apply 2 to 3 coats of sealer.  Allow the sealer to dry for about 30 minutes in between coats and at least an hour after the last coat before you start handling them.

diy coaster instructions

5.  Cut out felt squares to fit the back of the tile and use hot glue to glue felt on.  Work quickly b/c the glue dries fast on the tiles.

diy map coasters

Cute, right!?!

About these ads

Toddler Proof Christmas Card Display

2012 christmas card 4

Merry Christmas and Happy Holiday to one and all.  This is our card that we mailed out (minus the cute paper I glued each one on to).  Now I would like to share the virtual version with all of you.  I truly appreciate those of you who have come back to my little blog these past (almost) two years.  Thank you. *sniff*

Now on to business. (more…)

Soooooo easy DIY Snow Man Wreath

DIY snow man wreath

My sweet friend who was due to have her baby in December (she had a precious baby boy, 8 lb 7 oz) found this wreath on Pinterest a while ago.  She didn’t want to do the spray painting so she asked if I would be her wreath making slave for the day.  Of course!

You won’t believe how easy this was. (more…)

Burlap Art Display

Recently I got a bug to change up the art on my dining room wall.  My idea was to hang a bunch of empty frames and then display the kids art in the frames.  That way I could change out the art and it would be a little more classy and organized than just my normal scotch tape display method.

Inspiration:

I found this on  Pinterest

Took myself to Hobby Lobby to get above mentioned frames.  The ready made, empty frames that I wanted were over priced, in my opinion, even with the 50% off.  This confirmed my suspicion that Hobby Lobby raises the prices on various items just so that they can then label them 50% off and make the consumer think they are getting a deal.  Whatever, Hobby Lobby.  I’m on to you. (more…)

Spider Web Yarn Wreath Tutorial & DailyBuzz Moms 9×9

I’ve been thinking about this wreath for an entire year.  Last Halloween I never got around to making it but this year is my year!  Plus, I’m featured on DailyBuzz Moms 9×9 so an added incentive to get my butt in gear.  Thanks DailyBuzz Moms! (more…)

Game Day Wreath

Someone call Bob Stoops to let him know that I’ve got all of his OU home decor covered.  Ummmm…maybe his wife would appreciate this a little more.  I’m not too sure how much guys are into wreaths…even football wreaths.

After years of collecting OU football tickets for the specific purpose of creating a game day wreath I am happy to announce that all my patience has paid off.  Seriously, I’ve been saving all of our football tickets with the dream of one day turning them into a wreath.  One year, while waddling my 7 month pregnant self up the ramps to our upper deck seats, I told a friend about my plan.  The next week I received an envelope full of tickets that she and her husband had found discarded at the game.  What a sweet heart.

I feel fairly confident that our win against Texas Tech last week was due in part to this amazing wreath hanging with pride on my front door.  Sure, Damian Williams was on fire and Landry decided to show up and play like a Heisman trophy contender to redeem himself after the beating he took from Kansas State, but Sooner spirit goes a long way when it comes to wins and losses.

Should you decide to become obsessive about saving your favorite team tickets to make a wreath, here is what you will need:

Straw wreath (leave the plastic on)
large roll of deco mesh ribbon
16-20 football tickets
hot glue

1.  Wrap the wreath with the mesh ribbon.  I found it best to wrap this ribbon close and tight.  I used the smaller roll for this wreath and should have sprung for the bigger one.

I don’t have much advice on how to safely hot glue this ribbon down.  It’s mesh.  Hot glue burns.  If you have any advice on how to not burn your fingers while trying to get the mesh to stay down while the glue dries I would like to hear it.

2.  Apply hot glue to the top and bottom of the back of a ticket and secure to the wreath.  Again, this will toughen up your fingers.  The glue is hot even through the paper when you hold it in place.

(I can’t help but point out the newspaper headline.  More GOP voters in state.  Oh, really?!?  What did you think there would be more of?  We’re in Oklahoma for crying out loud.  There are about 6 Democrats total in the entire state.)

Anyhoo…moving on.

Continue gluing tickets all the way around the wreath.

3.  Add a bow.  I used wire, u-shaped, floral pins to secure the bow to my wreath.

I also had a few special tickets that I glued together in a fan to embellish the bow.  I used large glue dots to glue the tickets together.

Now you’re ready to hang your wreath with pride.  I decided not to spray the wreath with any sort of sealer as I wasn’t sure how it would effect the tickets.  So, I’m going to be careful about having it up only on game days, not let it get wet and will keep it stored in a cool, dry place.

Boomer Sooner!

Coffee Table to Train Table to Lego Table

Once upon a time there was an Ikea coffee table.

This is a story of a coffee table’s journey to becoming a Lego table.  (if you want to skip the tale, jump to the bottom for instructions on how to turn a coffee table into a Lego table)

In 1999 I moved into my first post-college, pre-marriage apartment.  I was living all by myself for the first time in a tiny place in West Hollywood.  Where does one go when they have no job and are on their own for the first time?  Ikea!  I found a rectangular, pine coffee table.  I don’t think they sell the style anymore but I imagine it came from the Herfenklunk collection.  It served me well, then me became we and it continued to do its duty as a place to eat dinner, rest cocktails, artfully displayed coffee table books, etc.  Soon we became three and the cocktails were replaced with sippy cups and coffee table books turned into board books.  It took a beating from Thomas trains and never complained a bit.

Soon we three moved across the country and expanded our living space.  We (and by we I mean he would play and I would have to sit and watch) played with trains night and day and I knew we needed a designated table just for trains.  Like the Giving Tree, the coffee table called out.  Come boy, come and dent my soft pine with your incecent pounding.  Come and play.  Who was I to deny a faithful table’s wish?  I sanded it down, added trim around the edge and painted it to match the new room.  Voila’!  Train table.  Boy and table were happy.

A few years passed happily then one day the boy declared that he “wasn’t into trains anymore” and the train table became a regular ol’ toy table.  It’s paint chipped, it became dusty and it’s purpose was forgotten.

Time went by and I decided that my dining room had just about had enough of the Lego explosion that had taken place.  This past weekend the coffee table was granted a new lease on life.  We cleaned her off, cleared away the dust and broken toys and set out to make her into a Lego table.

And the table was happy.

Should you wish to turn your old coffee table into a Lego table, here are simple instructions.

Supplies:  table, wood trim, sand paper, wood glue, 3/4 inch screws, paint, Lego foundation sheets, industrial strength adhesive or epoxy  (I used E 3000.  Hopefully it can take a beating).

Step 1.  Sand table.

Step 2.  Add trim all the way around the edge.  Measure and cut 1 1/4 x 1/4 trim to fit.  If you don’t have a way to make a clean cut, take your exact measurements to Lowes or Home Depot and they will do it for you.  Use wood glue and 3/4 inch screws to secure trim.  Don’t use nails.  Your child will eventually rip the trim off despite the fact that you put more nails than necessary.  Take it from me and use screws.  Make sure to pre-drill holes in the trim to prevent splitting.

Step 3.  Paint.

Step 4.  Position Lego foundation sheets on the table where you want them.  Before gluing create one big sheet by connecting the individual sheets with Legos.  Mark the corners of the Lego sheet on the table. DO NOT glue the sheets to the table flush up against each other without first connecting them with Legos.  Carefully remove the now connected Lego sheets and set aside.

Step 5.  Glue.  We decided to take our large sheet apart and glue down two at a time.  It’s really important to keep at least two sheets connected with Legos.  If you are gluing down in segments, only apply glue to the table in the area of each segment as you go.  Don’t apply all the glue at once.  You’re asking for trouble.  Line up the corners with the marks you made and hold firmly in place for a few minutes.  When you’re ready to glue the next two sheets, have a couple of Legos attached and hanging off the edge of the pieces you are going to glue next.  That way you can line them up with the sheets you just glued down.  Use the Legos as a guide to connect the new sheets next to the sheets you just glued down.  Again, if you just glue them flush up against each other the spacing will be off by a fraction of an inch and Lego play will become frustrating.  The last thing we need is irate Lego builders.

Each of the Lego sheets were $4.99.  This train table re-do cost me $40 plus glue and some new containers to sort Legos.  Addison and I spent the evening sorting Lego pieces.  My guess is that they will stay sorted for about 2 days and tiny Legos will get burried in the carpet but it’s worth it to see him being creative in his own space.

4th of July Yarn Wreath

Thursday, July 19th I finally hung up my 4th of July wreath.  What?  I’ve been busy.  The first week of July we were in New Mexico and the week before that was spent….doing something important.  I’m sure it had something to do with keeping little feet busy.

Anyhoo – It’s still July and over 100 degrees so I say this wreath will be appropriate for at least another month.  Red, white and blue is a summer time theme, not just one day in July.

Happy summer!

Pool Noodle Lightsaber

I got this idea from Pinterest and knew this was for us.  A lightsaber made from a pool noodle?  Of course! We already have multiple toy lightsabers, wiffle ball bat covered in construction paper to create a lightsaber, toy sword turned lightsaber.  Pool noodle is the next logical step.

This is so easy that if you have a little padawan learner at home you will wonder why you haven’t thought of this already.  And if you already have thought of this…go you!

Supplies:

pool noodle (we got ours at the dollar store)
silver duck tape
black and red permanent marker

1.  wrap duck tape around one end of pool noodle.  Cover about 10-12 inches of the noodle.

2.  Draw a lightsaber-ish design.

3.  Turn on Star Wars soundtrack on iPhone (we prefer Duel of the Fates from Episode I) and send kids outside to whack each other up side the head.

Battling it up can be hard work.  The best remedy for a tired padewan…popcicle.

We have yet to try these out in the pool so I can’t say how well the tape and marker hold up in the water.  My guess is not very well but for .99 per noodle I wouldn’t be too upset if it all fell apart.

DIY old dress to a new skirt

“They” say that if you haven’t worn an article of clothing in a year then you should get rid of it (exception being formal wear).  I’m pretty good about that except for a few items.  I have a few dresses that while I never wear any more I can’t seem to get rid of them.  Either the fabric is really pretty and I keep thinking I will do something else with it or it has sentimental value.  While I enjoy purging my closet every now and then I keep feeling like I should keep a few items for the long haul.  I have several beautiful pieces that were once my mom’s or grandmother’s and I LOVE them.  If I get rid of everything now I won’t have any fashion treasures to pass down to my future granddaughters. (more…)