Did I mention I love wreaths? Oh yeah, I did. I ran across this crafty idea at a blog called Feelin’ Crafty. I can’t believe I didn’t think of this myself. I must give credit where credit is due and the gal at Feelin’ Crafty is one crafty lady. Check her out for more yarn wreath ideas. This is a seriously simple wreath that is seriously cheap to make. However, it is more time consuming than my April Shower’s wreath.

Here’s what you need:
Straw wreath (leave the plastic on)
1 skein of yarn
felt
hot glue
optional: fabric or ribbon for a bow

Begin by wrapping the wreath with the yarn. I already had this yellow yarn from the days when I was delusional enough to think I was going to learn to knit and/or crochet and make something other than a scarf. I had grand ideas and then I woke up and realized that I’m never going to be a knitter and I’m okay with that. Now I need to figure out what do with all the yarn I have accumulated over the years. I got it…yarn wreaths! Anyhoo- this yarn was on the lighter side. Next time I’m going to try a heavier weight of yarn. I think the wrapping would go faster with something more thick.

I got this far after an episode of Mickey Mouse Club House. If I could have worked without distractions I think back to back episodes of Little House would have done the trick.
Once you have finished with the yarn, tie it off and set that aside. Now lets talk about felt. I got my felt at Hobby Lobby. It’s only 4 sheets for a $1 but you get what you pay for. The color selection is limited and the quality is crappy. If I were feeling up to it I would order felt online. I have bought quality felt that comes in beautiful colors at Benzie Bazaar.
Here’s how to make felt roses.

Start by cutting out a circle then cut that circle in a long ribbon. Clear as mud? Good.


Make sure you leave a small circle at the end.
Begin with the small end and roll it up. One side should be nice and neat while the other side will be uneven. The nice and neat side is the back and will be hot glued.


Apply hot glue to the neat side and press down the circle (or flap) that was left at the end.

Voila!
Experiment with the size of the circle you cut out to make big and small roses. I made one of my circles uneven and bumpy.

And it resulted in a rose like this:

Optional leaves:

Before you start to glue make sure to position your roses so you know what you want it to look like.


Imagine the color combinations! I think I have a new favorite craft. Love it.
Lynne Levy
completely adorable!
Kathryn Green
Miss –
Oh, my gosh! This is darling. Remind me of this next Spring. I’m looking for something out my back door for the summer. Needs to be large incorporated on a grapevine wreath.
MOM
Fall Yarn Wreath « Hugs, Kisses and Snot
[…] lined up so let’s get started! Teacher Appreciation is coming up so last week I made a yarn wreath as a door […]
An Easter Wreath Tutorial by Hugs Kisses and Snot! – I'm Feelin' Crafty!
[…] has sprung so it’s time to update the front door with a fresh spring wreath. Felt rosettes are nice but I wanted something different this year. Felt calla lilies will do the trick. These are […]
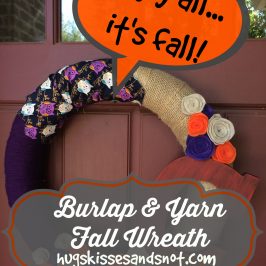
Fall Yarn Wreath & Felt Mum Tutorial | Hugs, Kisses and Snot
[…] the wreath with yarn. This wreath is 14 inches so it went by much faster than my 16 inch spring roses wreath. I was able to get that baby wrapped and have a meaningful conversation with dear husband at the […]